So what can you make for a boy? When I was pregnant with Charli, I made her a quilt for her crib. It was the first quilt I ever made, and although it wasn't a total bust, it's not my favorite thing I've ever sewn.

I, for some reason, can't find a picture once it was complete, but you get the idea.
I knew I had some fabric that I had purchased before we knew what baby #1 was (I used to be way less conservative with my spending!). My original plan was to maybe make a receiving blanket and burp cloth, but once I measured the fabric, I realized it was really only enough for a receiving blanket. I don't like the 30x30 blankets, I think they are way too small, so this blanket is somewhere around 36x44.
All I did was iron the fabric, square up the edges, and hem them all the way around. It's a nice blanket, but just didn't feel personalized enough. I decided I wanted to monogram it, but I don't have an embroidery machine, and I'm cheap so I'm not paying $10+ to have his name stitched into a receiving blanket. So I got to thinking...maybe, just maybe, I could applique his name onto the blanket! My MIL gave me a sewing bible a while ago (I don't know the exact name of it), but I looked through there to see if they had any directions on applique. They weren't great, but it reminded me of a stitch I have always loved on an old Holly Hobby quilt - blanket stitch! And so, the idea was born.
Supplies you need:
- felt or fleece to cut out the letters (I used fleece because it's softer)
- soft fuse
- iron
- embroidery thread (I used Valdani Pearl Cotton Size 8)
- embroidery needle (I didn't have one - I just used a larger gauge needle I already had)
The first thing I did was sketch out the name in block letters. I tried to find images of embroidery fonts or just regular fonts in Word, but decided to just go with my own handwriting. This doesn't need to be perfect because unless you have very precise cutting skills, the letters will look a little different in your fabric. Use a dark marker that will bleed through so your letters are visible on the back of your paper.

Next, I flipped my sketch paper over and traced it onto my soft fuse paper. Just kidding!! First, I didn't flip it over and messed it up because DUH when you cut out the letters on your fabric, they need to be backwards so the soft fuse glue is on the correct side.


Luckily, U is universal and I didn't have to redo that one letter. ;)
Next, I ironed the soft fuse to my fleece fabric. I bought mine from a sewing store and it didn't come with directions, so I just used the hottest setting on my iron and went over it a few times. Afterwards, it was kind of easy to peel the letters up so I think it needed more time or something. Try to follow the directions with yours. :)
After it cools, cut out all your letters from the fleece fabric. When you're ready to lay your letters out, peel off the paper backing from the soft fuse, and arrange the letters on your blanket.
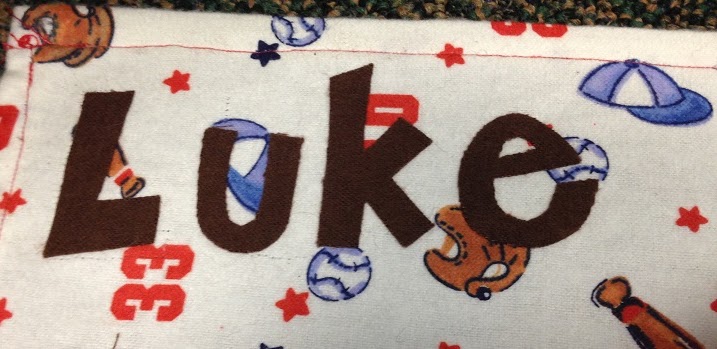
Iron them onto your blanket according to your soft fuse directions. The purpose of this soft fuse is to hold the letters in place and help make the applique more durable, but the blanket stitch will really be doing a lot of the work.
I think I'll make this a part I and part II tutorial since this post is already pretty long. Come back soon for part II! :)
~Kasey
ps. pin this on pinterest so you can find it later!!
No comments:
Post a Comment